What you need:
Wire Cutters
Round Nose Pliers
Pliers
20g wire
Chain (cut to your desired length)
2 Head Pins
2 Beads (any type)
What you do:
1. Put your selected bead onto the head pin.
2. Grab the wire immediately above the bead with your pliers.
3. Bend the wire over to a 90 ̊ angle.
4. Grasp the horizontal wire segment with the round nose pliers, as close to the 90 bend as possible.
5. Using your hands or the other set of pliers, grab that wire and wind it over the round nose. Continue going around the pliers until you form a loop.
6. At this point, you want to slip the pre-cut chain over the end of the head pin so that is sits inside that already formed loop.
7. To finish this wrapped loop, grab the loop with your pliers. As you hold onto the loop firmly, wrap the remaining wire around the top of bead, one, two or three times. Cut remaining wire.
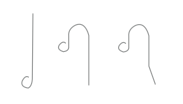
8. Creating the ear wire: Take the 20g wire. Cut off about a 1 1/2″ piece. Grab one end of the wire with your round nose pliers and form a small curl at the end. ␣ Next, measure about a 1/4 of an inch above the curl and rest the wire on the largest end of your round nose pliers, and curl again, in the opposite direction of that last curl you created. Lastly, on the other end of the wire, you can create a slight bend.
9. Last step, open up that small curl you created on your ear wire and slip the opposite side of the chain onto it. Re-close the curl and you have a finished earring.
10. Repeat the steps to create the matching pair and you’re done!


